Author: Max Nolan

  • Transforming a Built In Wardrobe with a Professional Respray

    Transforming a Built In Wardrobe with a Professional Respray

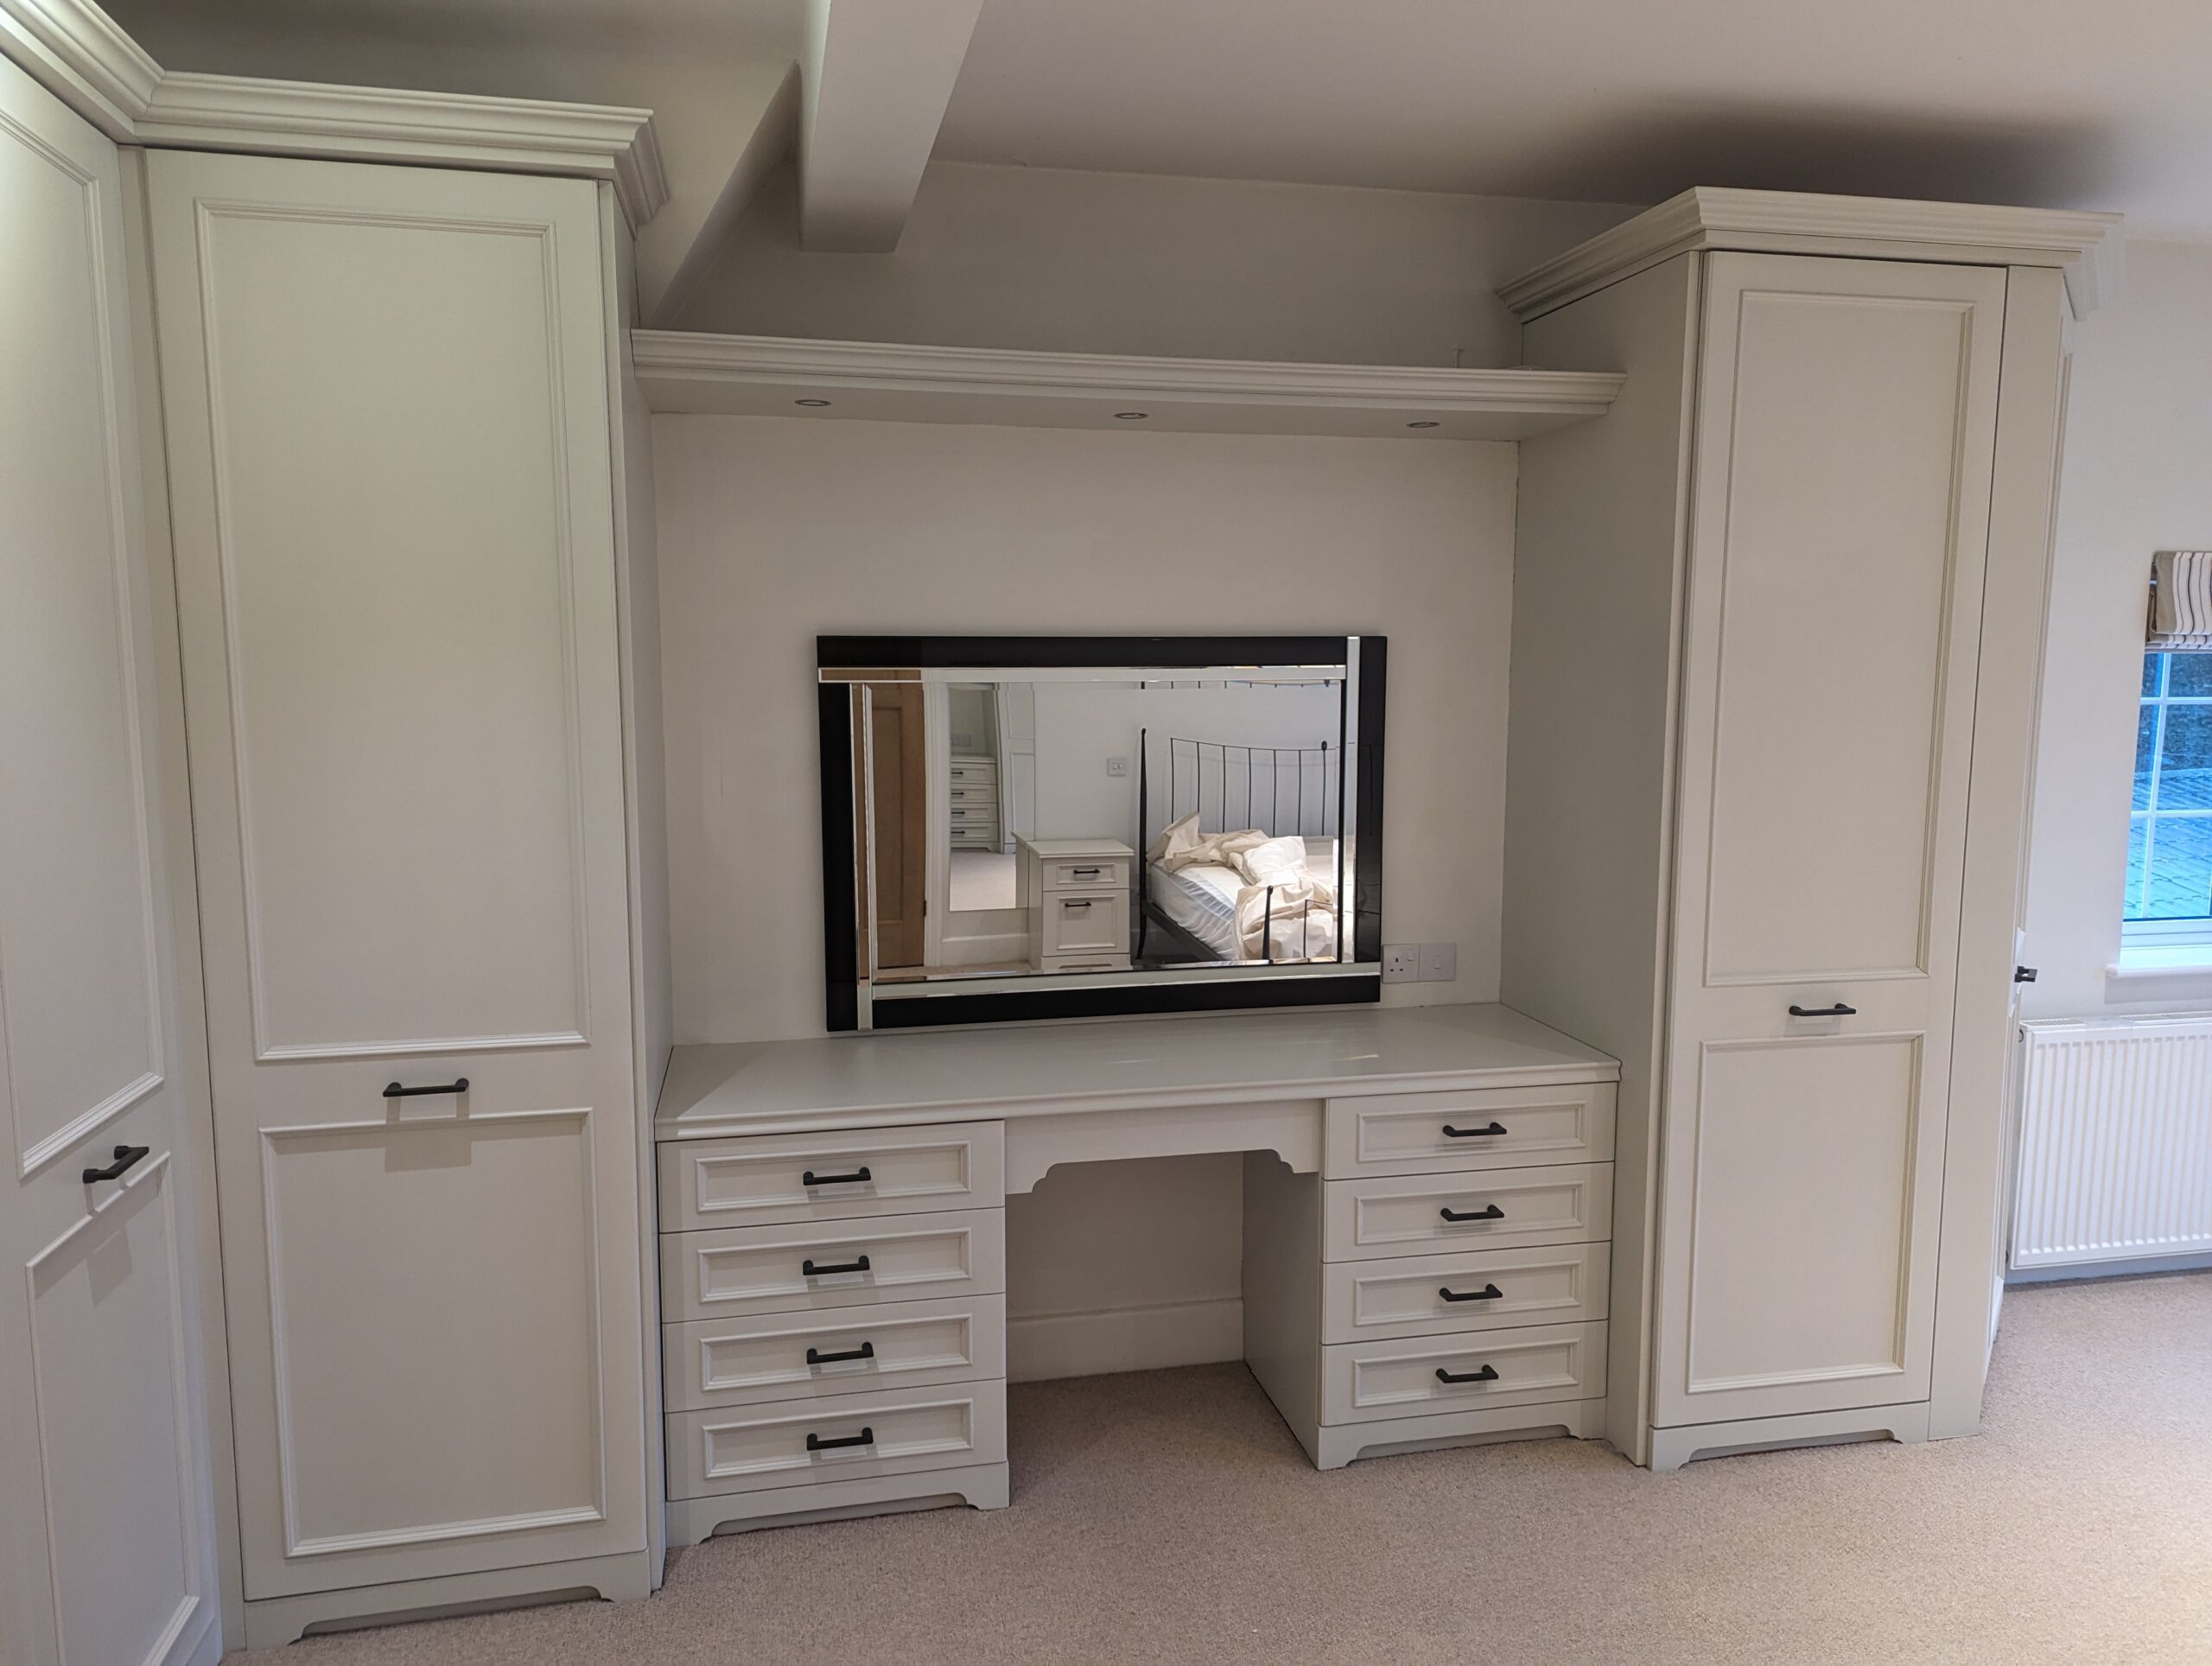
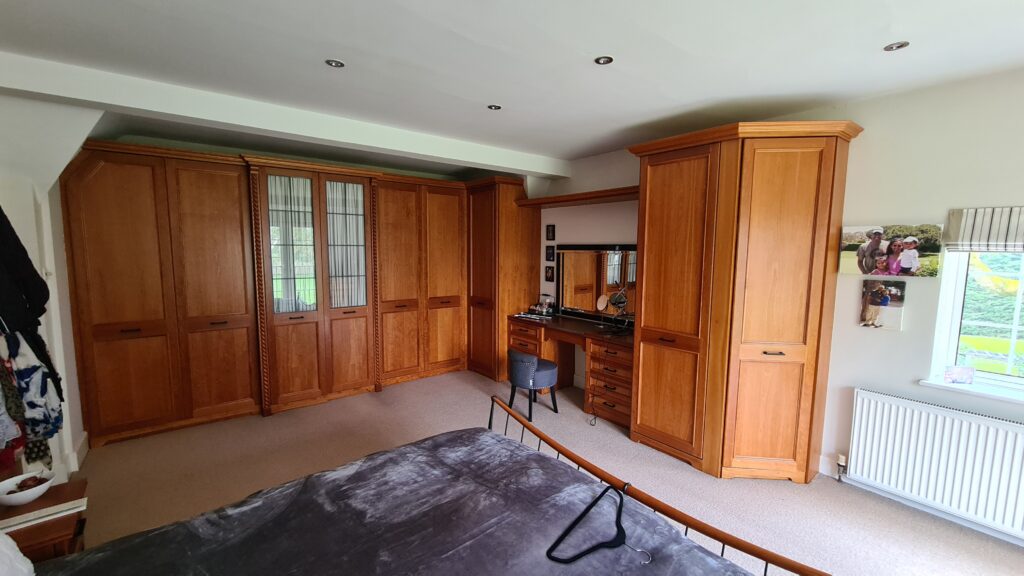
    Recently, I completed a project that involved respraying and renovating a built-in wardrobe, two chests of drawers, and two side tables. This project was a full transformation, updating veneered MDF furniture with a modern, water-based satin finish. Here’s a detailed look at the steps I took to achieve a professional finish, the challenges faced, and the techniques that ensured success.

    Materials and Tools Used

    • Paint: Farrow and Ball water-based satin paint, thinned for use with a spray gun.
    • Spray Guns: A larger spray gun for broad surfaces and a smaller one for tight areas.
    • Sandpaper: 150 grit for surface prep and fine sanding pads for between coats.
    • Masking Supplies: Frog Tape and plastic sheeting to protect the room.
    • Additional Tools: Screwdrivers for disassembly and basic sanding tools.

    Step-by-Step Process

    1. Disassembly and Preparation
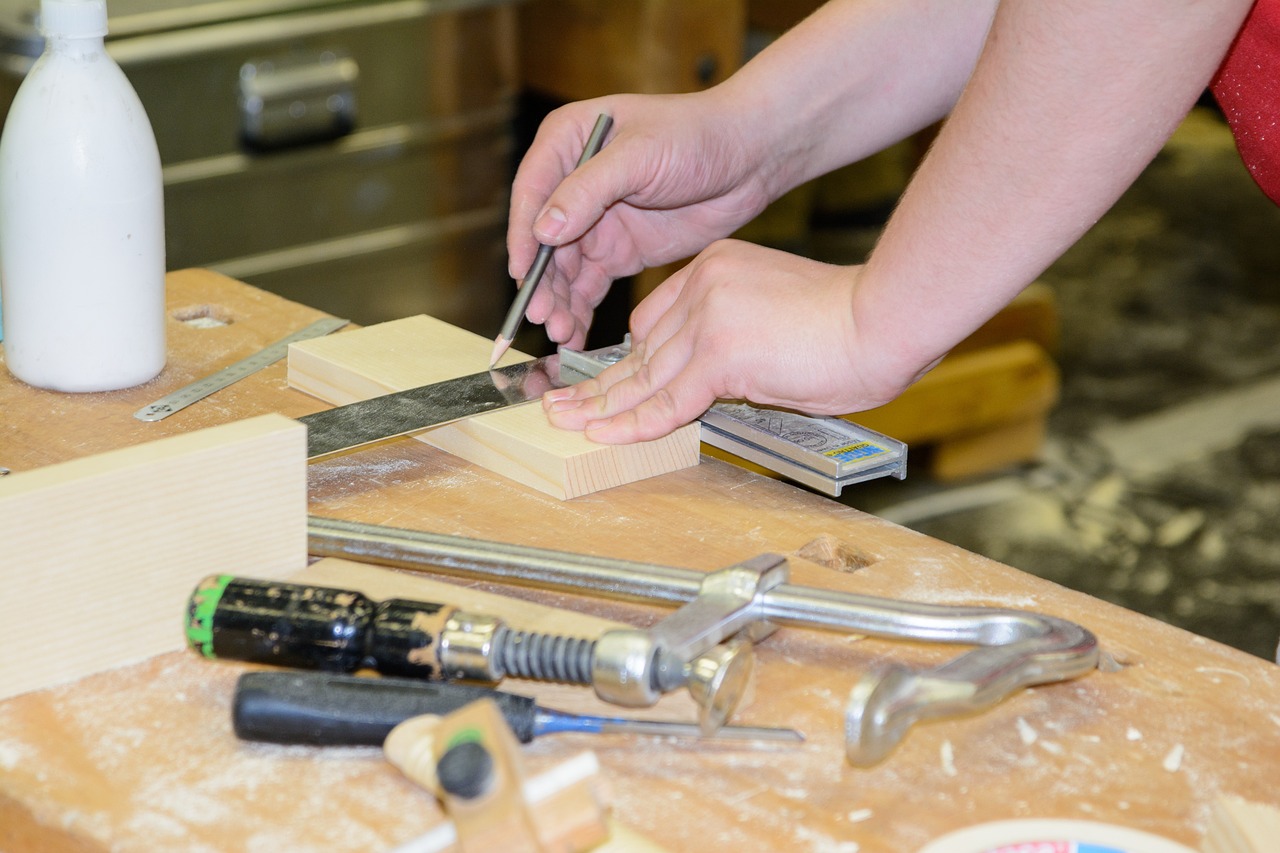
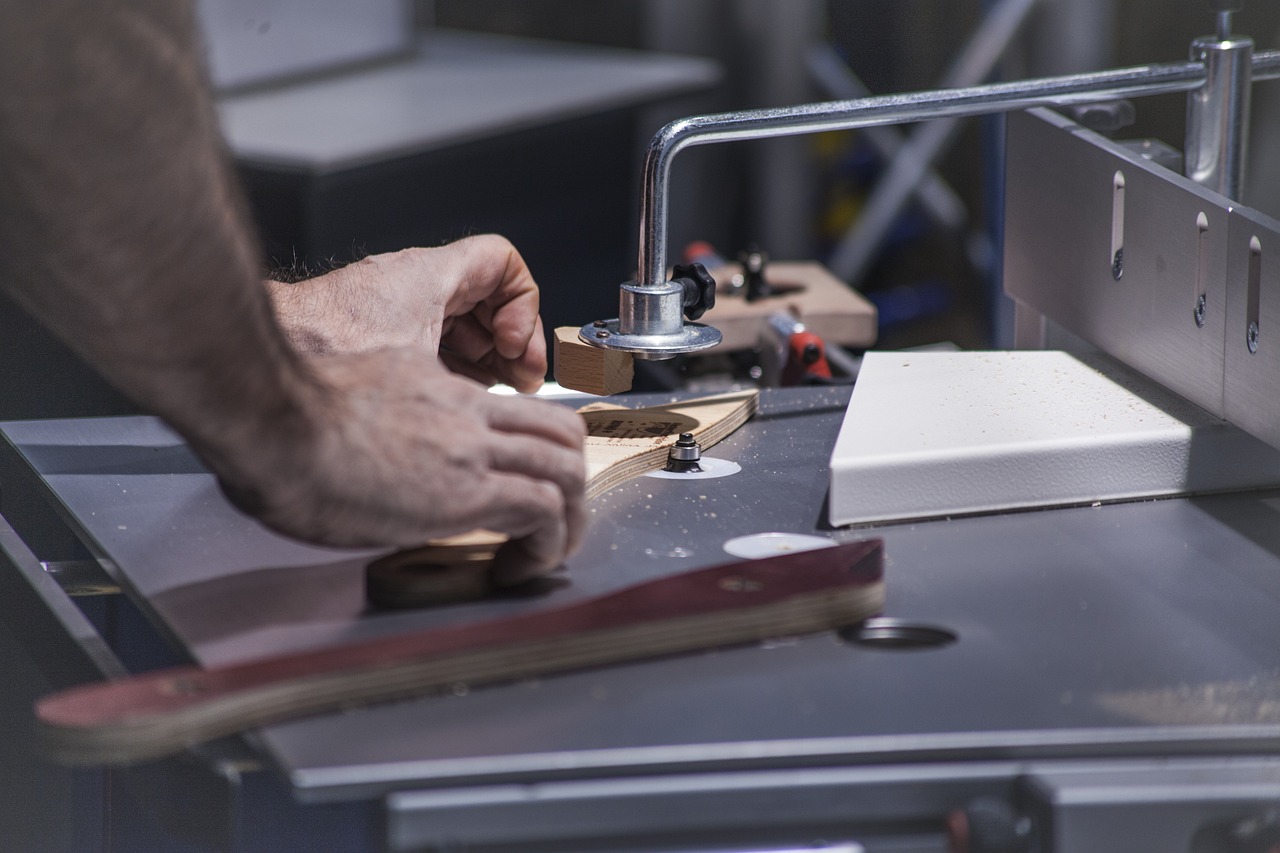
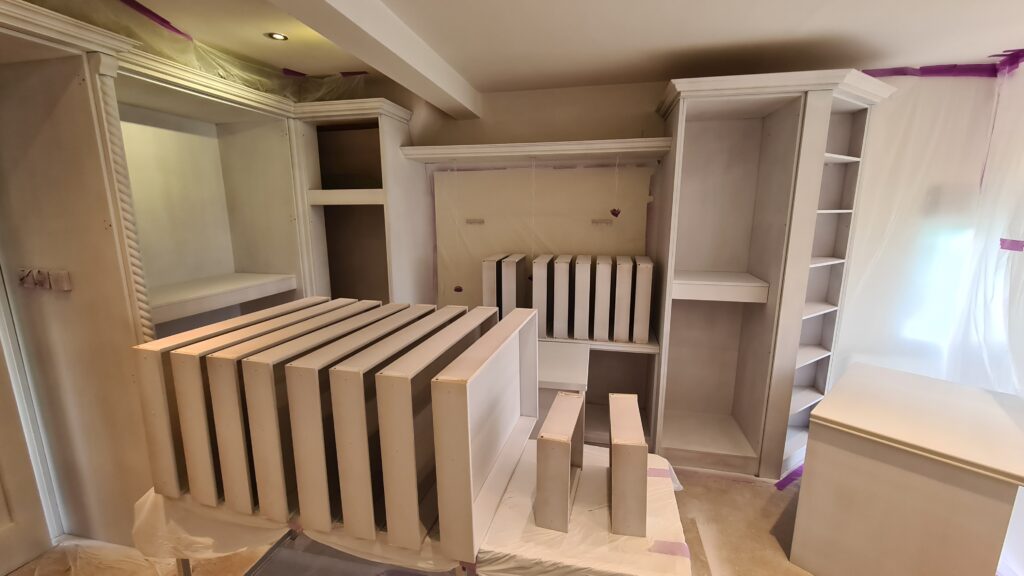
      The first step was to remove all doors, drawers, handles, and internal components from the built-in wardrobe and other furniture. I carefully labeled each part to make reassembly easier.Next, I masked off the room using plastic sheeting and Frog Tape. This was crucial to protect the carpet and other surfaces from overspray and paint dust.
    2. Sanding for Adhesion
      All surfaces, including the large panels of the built-in wardrobe, were sanded with 150-grit sandpaper. This step ensures the paint adheres properly to the veneered MDF and creates a smooth base for the primer.
    3. Priming and Undercoating
      Using a spray gun, I applied two coats of primer and undercoat to all components, including the wardrobe doors, side table surfaces, and drawer fronts. I sanded between coats to ensure a flawless finish.
    4. Applying the Topcoat
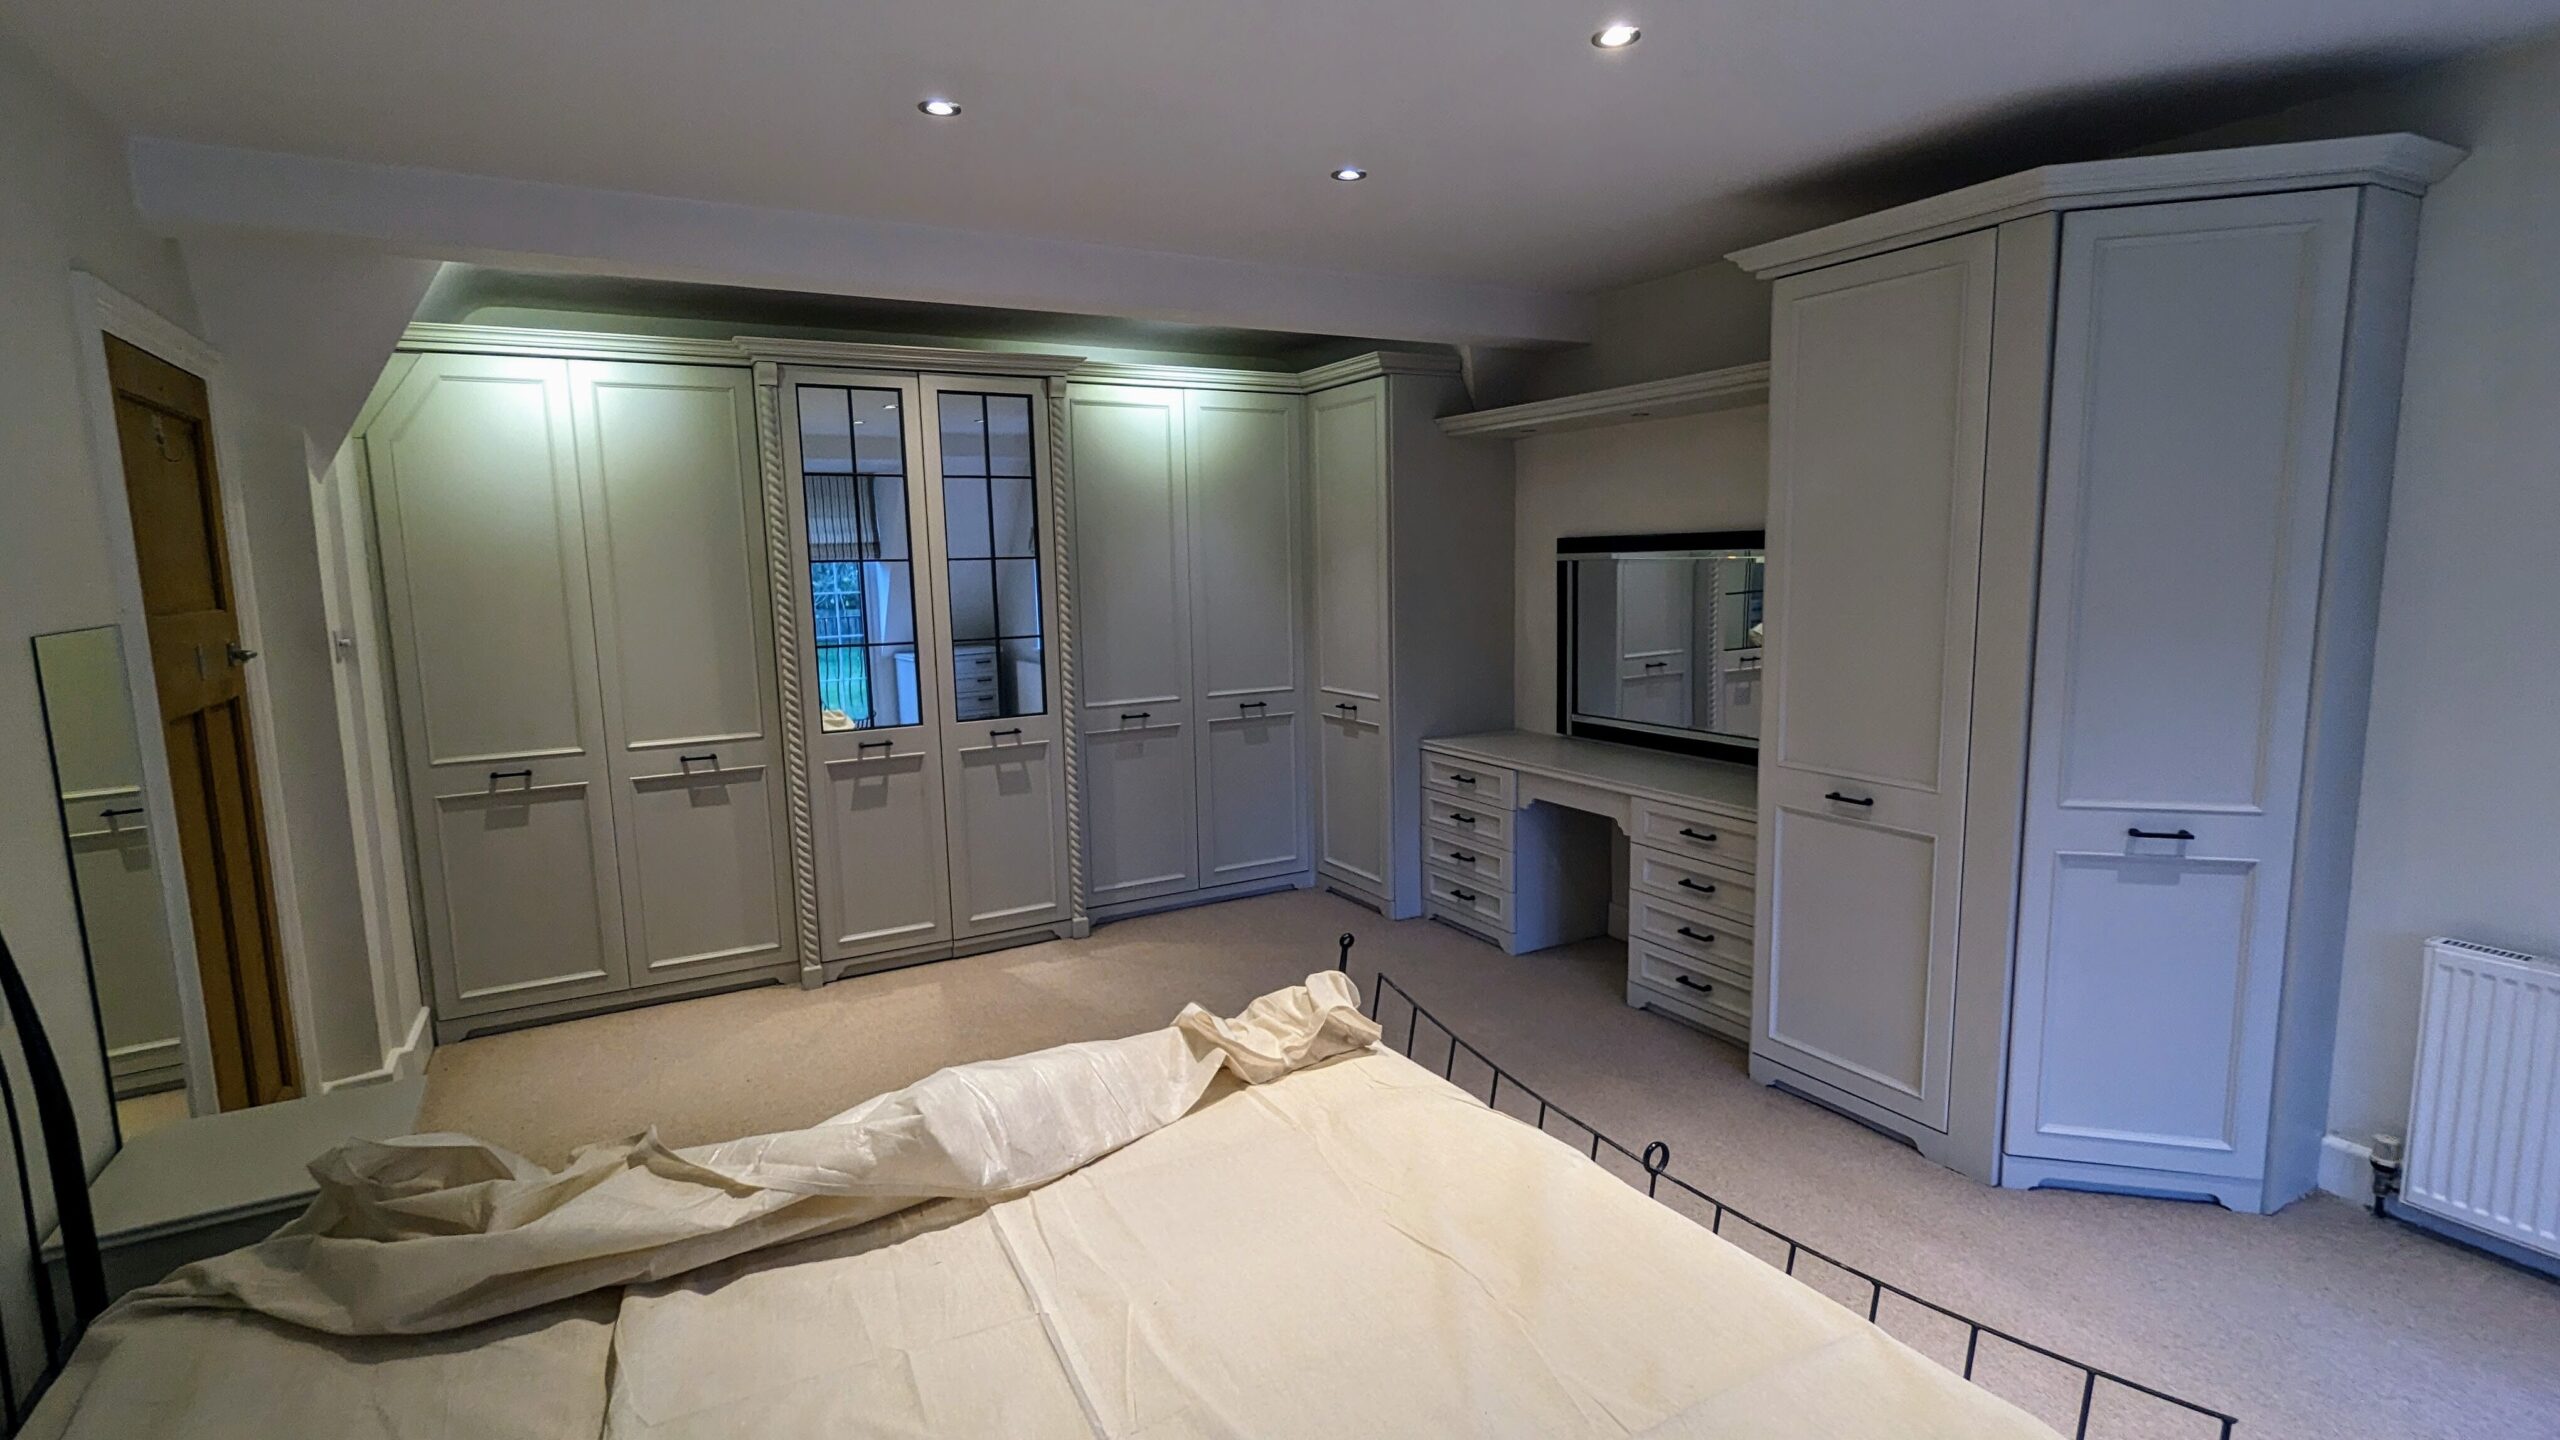
      For the topcoat, I used Farrow and Ball water-based satin paint, thinned for spraying. Multiple coats were applied, with light sanding between each coat to maintain an even and smooth finish. Tight corners and intricate sections of the built-in wardrobe were tackled with a smaller spray gun for precision.
    5. Reassembly
      Once the paint had fully dried, I reassembled all components, including reinstalling the wardrobe doors, drawers, and original handles.
    Wardrobe renovation during

    Challenges Encountered

    • Tight Spaces: Some areas of the furniture were difficult to reach. A smaller spray gun helped achieve a professional finish in these tricky sections.
    • Hundreds of Pieces: With numerous panels and components to paint, staying methodical was key to ensuring an even and consistent finish across all surfaces.
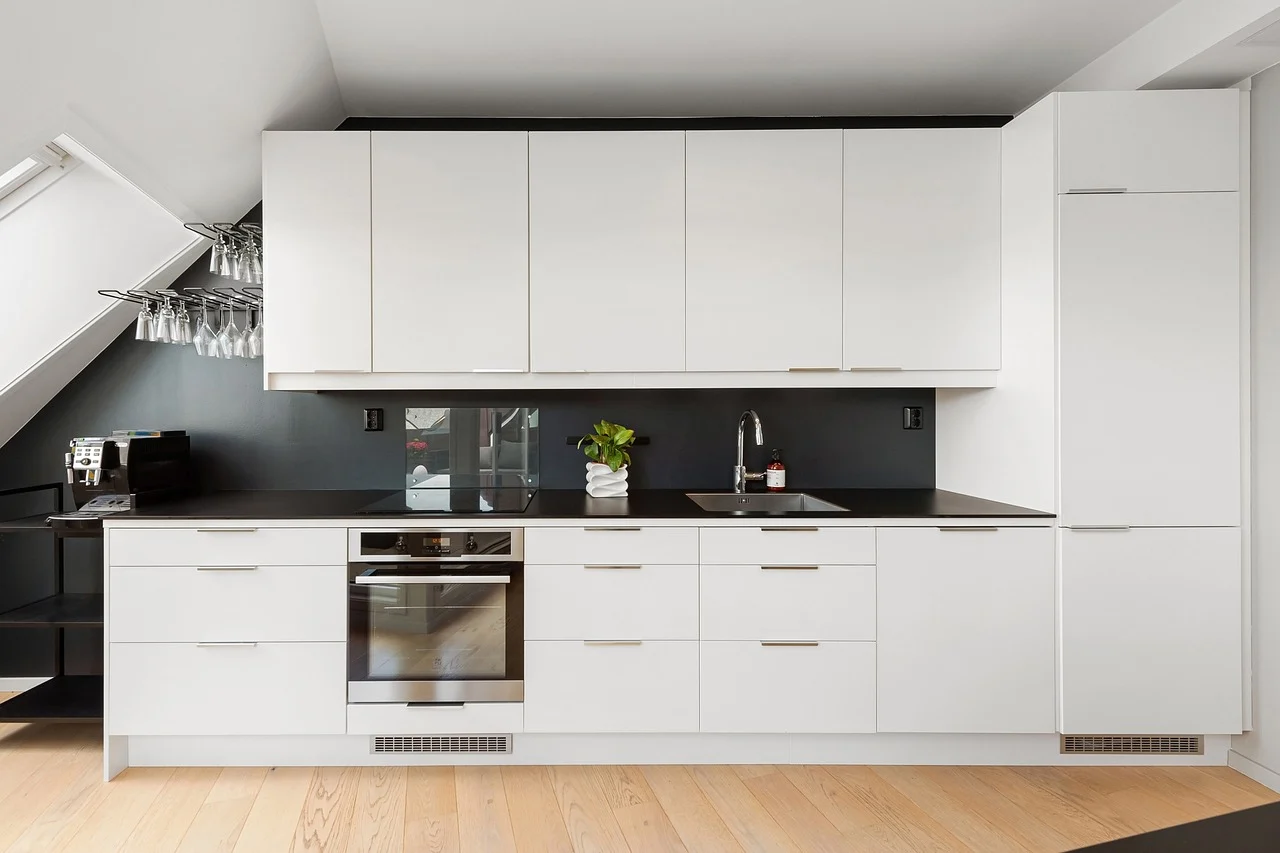
    The Results

    The dramatic transformation, with a completely new colour scheme, revitalized the room. The satin finish added a professional touch, and the durability of the water-based paint ensures the furniture will look great for years to come.

    Tips for Future Projects

    • Invest in Quality Masking Materials: Frog Tape provided clean lines and protected areas effectively during the project.
    • Be Systematic: Working in batches allowed me to rotate through different parts of the furniture without waiting for the paint to dry.
    • Reuse Hardware: Reusing the original handles was both time-saving and cost-effective while maintaining the furniture’s character.
    built in wardrobe renovation

    Maintenance Recommendations

    To keep the furniture looking its best, I recommend using a gentle cleaner for regular upkeep and avoiding abrasive chemicals. Adding felt pads to drawers and doors can also prevent paint from chipping over time.

    This project was a rewarding experience, demonstrating how careful preparation and attention to detail can completely transform furniture and elevate the overall look of a room.

    If you’re looking to transform your built-in wardrobe or other furniture with a professional respray and renovation, I can help bring your vision to life. Contact me today to discuss your project and get a personalized quote. Click here to get in touch!

  • Understanding First Fix Carpentry: The Backbone of Building Construction

    Understanding First Fix Carpentry: The Backbone of Building Construction

    First fix carpentry, often referred to as rough carpentry elsewhere, is a critical phase in any construction project. It involves creating the structural framework of a building and setting the stage for all subsequent work. While it may not include the detailed finishes that catch the eye, it ensures the structure’s strength, stability, and functionality.

    What Is First Fix Carpentry?

    First fix carpentry focuses on the structural aspects of a building, such as the walls, floors, roof structure, and timber frameworks. This phase happens before plastering or other finishes, meaning the work is primarily about creating a sound skeleton for the building.

    Key tasks include:

    • Framing: Constructing the timber framework for walls, floors, and ceilings.
    • Roof Structure: Building roof trusses or rafters to form the shape of the roof.
    • Floor Joists and Stud Walls: Installing horizontal and vertical timber to support floors and divide spaces.
    • Sheathing: Adding timber boards or plywood for structural strength.

    Unlike second fix carpentry, which focuses on the final touches like skirting boards and doorframes, first fix emphasises function over form.

    Tools and Materials Used

    First fix carpentry requires robust tools to handle large-scale timber work. Common tools include saws, drills, nail guns, hammers, spirit levels, and tape measures. Timber remains the primary material, although steel or engineered wood products are sometimes used for specific requirements.

    Why Is First Fix Carpentry Important?

    First fix provides the structural foundation for all other construction work. It ensures that the building is safe, functional, and capable of supporting additional layers, such as insulation, plasterboard, and roofing materials. A well-executed first fix phase is critical to the success of the entire project.

    For example:

    • Properly aligned floor joists prevent uneven surfaces.
    • A strong roof structure resists weather impacts and supports additional insulation.
    • Accurate stud wall placement allows smooth installation of plumbing and electrical systems.

    Career Opportunities in First Fix Carpentry

    In the UK, becoming a first fix carpenter often involves apprenticeships, hands-on training, or formal education in carpentry and joinery. Carpenters must understand building regulations and health and safety guidelines, as well as possess strong technical skills.

    For those looking to join the trade, organisations like City & Guilds offer courses and qualifications to help individuals gain the necessary expertise.

    First Fix Carpentry in Modern Construction

    The construction industry in the UK has embraced innovations that enhance first fix, such as pre-fabricated timber components and engineered wood products. These developments not only improve efficiency but also align with sustainability goals by reducing material waste.

    Final Thoughts

    First fix carpentry is the foundation of any successful construction project. It’s about building the framework that ensures strength, durability, and longevity. Whether you’re planning a home renovation or a new build, the quality of this stage is vital to the overall outcome.

    If you’re looking for expert carpentry services or have a project in mind, visit our Contact Page to get in touch with our team. We’re here to help bring your vision to life.

  • Choosing the Right Materials for Custom Cabinetry

    Choosing the Right Materials for Custom Cabinetry

    Custom cabinetry can elevate the functionality and aesthetic of any space, whether it’s a kitchen, bathroom, or office. Selecting the right materials is a crucial step in ensuring the durability, appearance, and overall quality of your cabinetry. This guide will walk you through the most common material options and considerations to help you make an informed decision.


    1. Solid Wood

    Advantages:

    • Timeless aesthetic appeal.
    • High durability and repairability.
    • Can be stained or painted to match various styles.

    Considerations:

    • Prone to warping or cracking with changes in humidity.
    • Generally more expensive than alternatives.

    Popular wood types for cabinetry include maple, cherry, oak, and walnut. Each type offers unique grain patterns and characteristics. For an in-depth comparison, Wood Magazine provides detailed guides on wood species.


    2. Plywood

    Advantages:

    • Strong and stable, resistant to warping.
    • Lightweight yet durable.
    • Versatile and cost-effective.

    Considerations:

    • The quality can vary depending on the grade.
    • Exposed edges need to be finished for a polished look.

    Plywood is often used for cabinet boxes due to its strength and stability, making it a popular choice in high-moisture areas like kitchens and bathrooms.


    3. Medium-Density Fiberboard (MDF)

    Advantages:

    • Smooth surface ideal for painting.
    • Resistant to cracking and warping.
    • Economical compared to solid wood.

    Considerations:

    • Less durable than solid wood or plywood.
    • Vulnerable to moisture unless properly sealed.

    MDF is a great choice for painted cabinets or intricate designs that require a smooth, uniform surface. For tips on maintaining MDF cabinetry, see HGTV’s maintenance guide.


    4. Particleboard

    Advantages:

    • Budget-friendly.
    • Lightweight and easy to install.

    Considerations:

    • Less durable and prone to damage over time.
    • Not suitable for high-moisture areas.

    While particleboard is an economical option, it’s generally best for low-traffic areas or temporary solutions.


    5. Laminates and Veneers

    Advantages:

    • Wide variety of colors and finishes available.
    • Scratch and stain-resistant.
    • Cost-effective and modern-looking.

    Considerations:

    • Can delaminate over time if not properly maintained.
    • Difficult to repair compared to solid wood.

    Laminates and veneers are often used as finishes over particleboard, MDF, or plywood to create a stylish and durable exterior. Learn more about their applications from Cabinet Makers Association.


    Key Considerations

    When choosing materials for your custom cabinetry, keep the following factors in mind:

    1. Budget: High-end materials like solid wood and premium-grade plywood are more expensive but offer longevity and timeless appeal. Economical choices like MDF and particleboard may fit tight budgets but come with trade-offs in durability.
    2. Functionality: Consider the environment where the cabinetry will be installed. For example, moisture resistance is critical in bathrooms and kitchens.
    3. Aesthetic Preferences: Your choice of material will influence the overall look of the cabinetry. Solid wood provides a natural and classic appearance, while laminates offer sleek, modern finishes.
    4. Maintenance: Some materials, like laminates, are easier to clean and maintain than others, like unfinished solid wood.

    Final Thoughts

    The material you choose for your custom cabinetry will significantly impact its performance, longevity, and appearance. By understanding the pros and cons of each material and evaluating your specific needs, you can select an option that combines beauty, durability, and functionality.

    For further reading on custom cabinetry materials, explore resources from trusted industry experts. Making an informed decision will ensure that your investment adds lasting value to your home or workspace.

  • DIY vs. When to Hire a Professional: Consider a Carpenter for Your Project

    DIY vs. When to Hire a Professional: Consider a Carpenter for Your Project

    Deciding whether to take on a carpentry project yourself or hire a professional carpenter is an important choice that depends on the scale, complexity, and risks involved. Below are scenarios where hiring a professional carpenter may be the better option.

    When to DIY:

    1. Small, Simple Projects:
      If you’re undertaking relatively small DIY projects like shelving, minor repairs, or installing flat-pack furniture, you may have the skills and tools to complete the task yourself.
      • Example: Installing a basic shelf or attaching a door handle.
      • Limitations: These types of projects often require less expertise and can be safely handled by most homeowners.
    2. Learning and Development:
      DIY projects can be a way to build basic carpentry skills and gain hands-on experience.
      • However, more complex work typically requires advanced tools, techniques, and expertise.

    When to Hire a Professional Carpenter:

    1. Complex and High-Risk Projects:
      If the project involves structural work such as framing, roof installation, or renovation of load-bearing elements, it’s best to hire a qualified carpenter.
      • Example: Installing a staircase, repairing structural timber, or constructing a roof.
      • Reason: Incorrect execution could lead to costly mistakes or safety risks.
    2. Specialist or Bespoke Work:
      For customised and detailed projects like bespoke cabinetry, timber framing, or historical restoration, a professional carpenter with specialised skills will ensure high-quality results.
      • Example: Creating a custom built-in unit or restoring period features.
      • Reason: These types of projects require precise craftsmanship and attention to detail that often exceeds DIY capabilities.
    3. Time and Resource Efficiency:
      Hiring a professional allows you to save time and access expertise that ensures the project is completed safely and to a high standard.
      • Example: A carpenter will handle planning, measurements, sourcing materials, and labour, leaving you with a finished result that meets professional standards.
  • Understanding Different Types of Carpentry: Specialisations and Career Paths

    Understanding Different Types of Carpentry: Specialisations and Career Paths

    Carpentry is a diverse trade that offers a variety of specialisations, each requiring different skills and expertise. If you’re considering a career in carpentry, understanding these specialisations will help you determine the best path for your skills and interests. Below are the key types of carpentry in the UK and what each entails.

    1. Rough Carpentry

    Rough carpentry involves the structural framework of buildings, including walls, roofs, and floors.

    • Typical tasks: Constructing frameworks, erecting partitions, installing joists, and ensuring load-bearing elements are built to specification.
    • Key skills: Excellent knowledge of building codes, measuring, and precise assembly of large-scale structures.
    • Career path: This is ideal for those interested in site-based, hands-on construction projects.

    2. Finish Carpentry

    Finish carpentry focuses on the installation of detailed, decorative elements that enhance a building’s aesthetics.

    • Typical tasks: Installing doors, windows, cabinetry, mouldings, skirting boards, and other fine joinery.
    • Key skills: Attention to detail, precision cutting, and an eye for finishes.
    • Career path: Suitable for those who enjoy working on interior spaces and prefer a more refined, detailed approach.

    3. Specialist Carpentry

    Specialist carpentry covers more niche areas such as bespoke joinery, furniture making, and historical restoration. Just to mention a few specialist types of carpentry.

    • Typical tasks: Custom furniture design, timber framing, built-in units, and historical renovations.
    • Key skills: Creativity, problem-solving, and advanced woodworking techniques.
    • Career path: This area is ideal for those who want to focus on unique, intricate projects or work with heritage properties.

    4. Custom Joinery

    Custom joinery involves the creation of unique, bespoke pieces tailored to a client’s specific needs.

    • Typical tasks: Designing and crafting built-in furniture, bookcases, cabinets, and other customised woodwork.
    • Key skills: High-level craftsmanship, precision joinery, and the ability to read and interpret detailed designs.
    • Career path: Suitable for those with a passion for woodworking and the desire to work on custom projects.
  • The Importance of Safety in Carpentry: Best Practices and Equipment Recommendations

    The Importance of Safety in Carpentry: Best Practices and Equipment Recommendations

    Carpentry can be a rewarding profession, but it comes with inherent risks that need to be managed with proper safety practices. From working with sharp tools to handling heavy materials, ensuring safety is a top priority for both carpenters and their clients. Below are key safety practices and essential equipment recommendations for carpenters working in the UK.

    Key Safety Practices:

    1. Training and Certification:
      Health and safety training is mandatory in the UK for all carpenters, especially when working on construction sites.
      • Ensure the carpenter holds a CSCS card, which demonstrates they’ve completed appropriate health and safety training.
      • All carpenters should be familiar with current regulations under the Construction (Design and Management) Regulations (CDM), which outline how to maintain safety on-site.
    2. Use of Personal Protective Equipment (PPE):
      Carpenters must use the correct PPE to minimise risks of injury.
      • Safety Boots: Steel-toed boots protect against heavy or sharp objects falling.
      • Gloves: Reduce the risk of cuts and abrasions from handling wood and tools.
      • Goggles: Protect eyes from sawdust, wood splinters, and flying debris.
      • Dust Masks: Prevent inhalation of sawdust and wood particles, which can cause respiratory issues.
      • Hearing Protection: Power tools can be noisy, so ear protection is essential to prevent hearing damage.
    3. Tool Safety and Maintenance:
      Proper use and maintenance of tools are critical to ensure safety in carpentry and efficient work.
      • Ensure tools such as saws, drills, and nail guns are regularly serviced and inspected.
      • Use tools according to manufacturer guidelines and ensure they are in good working order to prevent accidents.
    4. Manual Handling and Lifting Techniques:
      Handling heavy materials like wood, doors, and cabinetry requires proper lifting techniques to prevent back and joint injuries.
      • Use correct posture and techniques when lifting heavy loads, such as bending the knees and keeping your back straight.
      • Carpenters should avoid overexertion and utilise mechanical aids like hoists or trolleys when necessary.

    Equipment Recommendations:

    1. Hand Tools:
      • Hammer: A reliable hammer with a sturdy handle is essential for driving nails and other fasteners.
      • Saw: A quality hand saw or circular saw is essential for accurate cuts.
      • Chisels and Planes: Used for shaping and smoothing wood.
    2. Power Tools:
      • Cordless Drill: Essential for driving screws and drilling holes.
      • Circular Saw: Useful for making straight, precise cuts in wood.
      • Jigsaw: Ideal for cutting curved or irregular shapes.
      • Sander: Ensures smooth finishes, especially when working with wood.
    3. Safety Equipment:
      • Dust Extraction System: Helps control dust and maintains a cleaner, safer working environment.
      • First Aid Kit: Essential for treating minor injuries.
      • Tool Belts: Provide easy access to tools and keep workstations organised.
    4. Temporary Structures and Guardrails:
      • Scaffolding or Ladders: For reaching heights safely.
      • Guardrails: Ensure safety on elevated surfaces to prevent falls.
  • Tips for Hiring a Reliable Carpenter: What to Look For and Avoid

    Tips for Hiring a Reliable Carpenter: What to Look For and Avoid

    Hiring a reliable carpenter is essential to ensure your project runs smoothly and meets your expectations. Whether you’re looking to install custom cabinetry, renovate a room, or undertake a larger building project, choosing the right carpenter will significantly impact the outcome. Below are key factors to consider when hiring a carpenter and common pitfalls to avoid.

    What to Look For:

    1. Qualifications and Certifications:
      Ensure the carpenter has the appropriate qualifications such as NVQ Level 2 or 3 in Carpentry & Joinery, and holds a valid CSCS card (Construction Skills Certification Scheme). These are essential for working legally on construction sites in the UK.
      • The CSCS card confirms that the carpenter has undergone the necessary health and safety training.
      • If you’re hiring for more specialised work, such as bespoke joinery or timber framing, look for additional certifications or apprenticeships.
    2. Experience and Portfolio:
      A reliable carpenter should have a proven track record of completed projects. Request to see their portfolio or examples of previous work to assess their capability and quality of craftsmanship.
      • Look for projects similar to yours, whether it’s cabinetry, framing, or finish carpentry.
      • Check for testimonials or reviews from previous clients, and ask for references to ensure they have a history of satisfied customers.
    3. Specialisation and Skills:
      Carpenters often specialise in different areas, such as rough carpentry, finish carpentry, or custom joinery. Ensure the carpenter has the relevant experience for your specific project.
      • If you need bespoke furniture, cabinetry, or timber framing, opt for a carpenter who has specialised skills in these areas.
      • A carpenter who is adaptable and can handle both structural and finish carpentry is beneficial, especially for larger renovation projects.
    4. Insurance and Liability:
      A professional carpenter should have public liability insurance to cover any accidents or damages that may occur during the project.
      • Ensure the insurance is valid and up to date before work begins.

    Common Pitfalls to Avoid:

    1. Choosing Based Solely on Price:
      While cost is important, selecting the cheapest option often leads to subpar results. Higher-quality work typically comes with a fair price that reflects the skills and experience required.
      • Always request detailed quotes and compare what’s included. Beware of low bids that may lack essential services or hidden costs.
    2. Lack of Communication and Professionalism:
      A professional carpenter should communicate clearly and regularly throughout the project.
      • Avoid carpenters who don’t provide a clear plan, timeline, or updates. Effective communication ensures the project stays on track and issues are addressed promptly.
    3. Unverifiable References and Poor Track Record:
      Be cautious of carpenters who are unwilling to provide references or show a lack of portfolio examples.
      • Verifying their work is essential to ensure the quality of craftsmanship and reliability.
    4. Lack of Health and Safety Awareness:
      Carpenters who disregard health and safety regulations pose a risk to both themselves and your property.
      • Ensure the carpenter follows UK health and safety standards, uses the correct safety equipment, and maintains a safe working environment.
  • Top 5 Tips for Choosing the Perfect Custom Cabinetry for Your Home

    Top 5 Tips for Choosing the Perfect Custom Cabinetry for Your Home

    When it comes to enhancing your home with custom cabinetry, making the right choices is essential. Not only does high-quality cabinetry add to the visual appeal of your space, but it also plays a vital role in functionality and long-term durability. Here are five key tips to guide you in selecting custom cabinetry that suits both your needs and your home.

    1. Consider Your Storage Needs

    One of the first factors to evaluate is how much storage you require. Consider the space you have available and how you plan to use your cabinetry. For example, if you’re installing kitchen cabinets, think about the storage demands for cooking utensils, appliances, and pantry items. In bathrooms, assess how much space is needed for toiletries and linens. Opting for custom cabinetry allows you to maximise space efficiently, ensuring every inch serves a purpose.

    2. Material Selection and Durability

    Choosing the right material is crucial to the durability and longevity of your cabinetry. In the UK, the climate can impact wood choices. For kitchens and bathrooms, moisture-resistant materials like MDF or plywood are ideal, as they resist warping and swelling. Hardwood options such as oak or walnut provide strength and longevity, ideal for areas exposed to heavy use. Always ensure the materials you select are suitable for the environment in which they will be installed.

    3. Design and Style

    Your cabinetry should complement the overall design of your home. Whether you prefer a traditional, modern, or transitional look, custom cabinetry offers the flexibility to create a unique design tailored to your aesthetic preferences. Ensure that the style of the cabinetry aligns with the rest of your home’s décor, whether that’s through the choice of door styles, hardware, or finishes.

    4. Functionality and Accessibility

    Custom cabinetry should enhance the functionality of your space. Think about how your family uses the area—whether you need pull-out drawers, soft-close hinges, or adjustable shelving. For instance, in a kitchen, pull-out pantry units can maximise storage efficiency, while in a home office, built-in shelves provide dedicated storage solutions. Ensure your cabinetry enhances ease of access and daily operations.

    5. Seek Professional Expertise

    Finally, it’s crucial to work with a reputable carpentry professional who can guide you through the design and installation process. They will have the expertise to provide advice on material selection, layout, and ensuring your custom cabinetry is installed to the highest standards.

    By following these tips, you’ll be able to make informed decisions about your custom cabinetry and ensure it meets both your functional and aesthetic requirements. For further assistance, visit the Contact page to discuss your project in detail.

  • How to Become a Carpenter: A Step-by-Step Guide

    How to Become a Carpenter: A Step-by-Step Guide

    Carpentry is a highly skilled trade that involves working with wood and other materials to build, repair, and install structures. Whether you’re interested in residential, commercial, or bespoke projects, becoming a carpenter requires a combination of technical knowledge, hands-on expertise, and practical experience. If you’re considering a career in carpentry, here’s a step-by-step guide to help you get started.


    1. Understand the Role of a Carpenter

    Carpenters are involved in a wide range of tasks, from constructing structural frameworks to installing finishing touches such as doors, windows, cabinetry, and trim. The role can be broadly divided into three main areas:

    • Rough Carpentry: Involves structural elements like framing, flooring, and wall construction.
    • Finish Carpentry: Focuses on the installation of detailed elements such as trim, moldings, cabinetry, and decorative features.
    • Specialist Carpentry: Covers bespoke work like furniture making, custom joinery, and restoration.

    Understanding these areas will help you decide which path suits your interests and career goals.


    2. Develop Essential Carpentry Skills

    To succeed as a carpenter, you need a combination of technical knowledge and practical expertise. Key skills include:

    • Measuring and Mathematical Skills: Accurate measurements and calculations are essential to ensure precise fitting and alignment.
    • Tool Proficiency: Mastery of both hand tools (like saws, hammers, and chisels) and power tools (such as drills, circular saws, and sanders).
    • Blueprint and Plan Reading: Understanding technical drawings and plans is crucial to accurately execute projects.
    • Problem Solving and Adaptability: Carpentry often requires troubleshooting and adapting to varying site conditions and unforeseen challenges.

    3. Pursue Training and Qualifications

    While not always mandatory, gaining formal training and certifications enhances your chances of success. Options include:

    • Apprenticeships: The most common pathway, combining on-the-job training with classroom learning, leading to an NVQ (National Vocational Qualification) in Wood Occupations (Carpentry and Joinery).
    • Trade Schools and Colleges: Courses such as City & Guilds or BTEC qualifications in Carpentry & Joinery offer both practical and theoretical training.
    • Self-Learning: For those unable to access formal training, online courses, books, and workshops can be useful in supplementing your knowledge.

    Obtaining a CSCS (Construction Skills Certification Scheme) card may also be necessary if you plan to work on construction sites.


    4. Gain Practical Experience

    Hands-on experience is critical for developing carpentry skills. Start by working as a carpenter’s mate or assistant, supporting experienced professionals and gradually taking on more responsibility.

    • Apprenticeships: Typically lasting 2-4 years, apprenticeships provide the mix of supervised work and classroom instruction.
    • Entry-Level Positions: Labouring jobs allow you to learn the basics while gaining practical knowledge of materials and tools.
    • Freelance Projects: Building a portfolio of smaller projects like shelving, furniture, or repairs can help establish your skills and reputation.

    5. Build a Tool Kit

    Investing in quality tools is essential for effective and efficient carpentry work. Key tools include:

    • Measuring Tools: Tape measures, spirit levels, and squares for accurate fitting.
    • Cutting Tools: Circular saws, hand saws, and jigsaws are necessary for precise cuts.
    • Power Tools: Drills, impact drivers, and sanders are essential for speed and accuracy.
    • Safety Equipment: Personal protective equipment (PPE) like gloves, goggles, and dust masks are crucial to prevent injury on site.

    6. Obtain Certification and Licenses

    In many regions, certifications and licenses are required to work legally as a carpenter. These include:

    • CSCS Card: Required for working on construction sites to ensure you meet health and safety standards.
    • NVQ Qualifications: A Level 2 or Level 3 NVQ in Wood Occupations (Carpentry and Joinery) is commonly required.
    • Further Qualifications: Advanced apprenticeships, such as the Advanced Site Carpentry qualification, can enhance your skills and career prospects.

    7. Specialise in a Niche

    Once you’ve developed foundational skills, specialising in a niche area can help set you apart and open up new opportunities:

    • Bespoke Furniture Making
    • Cabinet Making and Joinery
    • Timber Frame Construction
    • Restoration and Historical Carpentry

    Specialising allows you to build expertise and stand out in high-demand areas of the industry.


    8. Build a Career or Start Your Own Business

    With the necessary qualifications and experience, you’re ready to build a career. Whether working for a construction firm or running your own business, maintaining a reputation for quality and reliability is key.

    • Employment: Many carpenters gain experience working with established firms before branching out on their own.
    • Self-Employment: Starting your own business as a carpenter requires additional responsibilities like marketing, managing clients, and ensuring compliance with legal requirements.

    Conclusion

    Becoming a carpenter requires a mix of training, hands-on experience, and continuous skill development. By following these steps, you’ll be equipped with the knowledge and expertise needed to pursue a successful career. Whether you work on-site, specialise in custom projects, or establish your own business, the demand for skilled carpenters continues to grow, offering long-term job stability and opportunities for advancement.

    If you’re ready to take the next step in your carpentry career, start today—your future in carpentry begins now!

  • Crafting Quality and Trust: The Story of MWN Carpentry

    Crafting Quality and Trust: The Story of MWN Carpentry

    For as long as I can remember, I’ve been fascinated with building things. One of my earliest and fondest memories is receiving a children’s carpenter toolset from my grandfather. Whether it was Christmas or my birthday, I can’t recall, but I vividly remember the excitement I felt unwrapping it. That little toolset quickly became my favourite possession, and every time I visited my grandparents, I’d ask to play with it. Those early days of hammering and sawing with toy tools unknowingly laid the foundation for my career as a carpenter.

    Though I initially pursued a career as a chef, my heart always pulled me back to working with my hands differently. Eventually, I retrained as a carpenter, and the craft felt natural. My path to running my own business was not immediate—I spent years as a carpenter’s mate, gaining invaluable hands-on experience, refining my skills, and building my toolkit along the way. By the time I established MWN Carpentry in 2014, I was ready to take on the challenges and opportunities of professional woodworking.

    large rafter project for a carpenter

    A Growing Business with a Commitment to Excellence

    Since its inception, MWN Carpentry has grown significantly in scope and ambition. Today, I confidently handle complex and large-scale projects, ranging from intricate built-ins to substantial structural work. My approach to every project begins with the client: I visit their property to understand their needs, take measurements, capture photographs, and jot down notes. From there, I create a detailed proposal with a clear price and timeline. Once the client approves, I schedule the job and get to work.

    A recent highlight was a custom-built pocket door. This large and heavy project required careful planning and precision to ensure it operated flawlessly while achieving a striking aesthetic. Delivering a result that exceeded my client’s expectations reaffirmed why I love being a carpenter and creating work that stands out for its quality.

    large framing carpenter project

    Why Choose MWN Carpentry?

    MWN Carpentry is defined by more than just craftsmanship—it’s about the care and dedication I bring to every project. I pride myself on being approachable and honest, offering competitive pricing while maintaining the highest standards of quality. Clients trust me to bring their ideas to life, and I ensure we’re aligned by asking for reference images and discussing every detail. After all, the end result is about what they want, not just what I envision.

    As a carpenter committed to durability and excellence, I rely on my expertise to recommend the best materials and techniques for each project. By paying close attention to detail and focusing on quality, I deliver work that’s not only functional but built to last.

    If you’re ready to begin your next project or have an idea to explore, I’d love to hear from you. Visit the Contact page today, and let’s bring your vision to life!